1.To checkout a verison in date 2017/12/25
svn co -r {2017-12-25} http://mydomin.com/svntree2.To checkout a revision 168 in date 2017/12/25
svn co -r 168 http://mydomin.com/svntree

1.To checkout a verison in date 2017/12/25
svn co -r {2017-12-25} http://mydomin.com/svntree2.To checkout a revision 168 in date 2017/12/25
svn co -r 168 http://mydomin.com/svntree
    UITapGestureRecognizer *tap = [[UITapGestureRecognizer alloc] initWithTarget:self.view action:@selector(endEditing:)];
    tap.cancelsTouchesInView = FALSE;
    tap.delegate = self;
    [self.view addGestureRecognizer:tap];
1.Generate keystore
keytool -genkey -v -keystore [keystore filename] -alias Release -keysize 2048 -validity 10000 -keyalg RSA -dname "CN=[CNName], OU=Mobile Development, O=[AuthorName], L=[CityName], ST=[StateName], C=[CountryName]" -keypass [password] -storepass [Storekey]

2.List keys information in keystore
keytool -list -v -keystore [keystore filename] -storepass [password]
官網文件連結
https://firebase.google.com/docs/admob/android/quick-start
1.在Firebase建立新project
https://firebase.google.com/docs/android/setup
1.1設定
此處的 app id 要和 Android Studio 裡的 package name 完全相同
否則會錯
例:
1.2下載 google-services.json
1.3修改 專案層級 的 build.gradle
buildscript {
dependencies {
// Add this line
classpath ‘com.google.gms:google-services:3.0.0’
}
}
1.4修改 app 層級的 build.gradle
//Add to the bottom of the file
dependencies {
// compile ‘com.google.firebase:firebase-ads:9.8.0’ //Admob
compile ‘com.google.firebase:firebase-ads:9.2.1’ //Admob
}
// Add to the bottom of the file
apply plugin: ‘com.google.gms.google-services’
1.5點 Android Studio 裡 gradle 的 Sync Now
2.修改 strings.xml
加這列
<string name=”banner_ad_unit_id”>ca-app-pub-1234581776212345/1234512345</string>
3.修改 layout/xxxActivity.xml
加 namespace
xmlns:ads=”http://schemas.android.com/apk/res-auto”
加 adView element
<com.google.android.gms.ads.AdView
android:id=”@+id/adView”
android:layout_width=”wrap_content”
android:layout_height=”wrap_content”
android:layout_centerHorizontal=”true”
android:layout_alignParentBottom=”true”
ads:adSize=”BANNER”
ads:adUnitId=”@string/banner_ad_unit_id”>
</com.google.android.gms.ads.AdView>
4.修改 MainActivity.java
import com.google.android.gms.ads.AdRequest;//Admob
import com.google.android.gms.ads.AdView;//Admob
import com.google.android.gms.ads.MobileAds;//Admob
protected void onCreate(Bundle savedInstanceState) {
…
//Add the following lines
//————————————
// Admob
//————————————
MobileAds.initialize(getApplicationContext(), getString(R.string.banner_ad_unit_id));//Admob
AdView mAdView = (AdView) findViewById(R.id.adView);
com.google.android.gms.ads.AdRequest.Builder builder = new com.google.android.gms.ads.AdRequest.Builder();
// builder.addTestDevice(“12345123451234512345123451234512″);
// AdRequest adRequest = new AdRequest.Builder().build();
com.google.android.gms.ads.AdRequest adRequest = builder.build();
mAdView.loadAd(adRequest);
}
5.修改 AndroidManifest.xml
加
<uses-permission android:name=”android.permission.INTERNET” /><!–<ff>for Admob</ff>–>
6.修改 layout/xxx.xml
<com.google.android.gms.ads.AdView
android:id=”@+id/adView”
android:layout_width=”wrap_content”
android:layout_height=”wrap_content”
android:layout_centerHorizontal=”true”
android:layout_alignParentBottom=”true”
ads:adSize=”BANNER”
ads:adUnitId=”@string/banner_ad_unit_id”>
</com.google.android.gms.ads.AdView>
invalid app id
在 adhoc build 時出現 Invalid app id 的錯誤訊息
奇怪的是很久之前可以,現在卻不行
解決方法是
將原來「由Xcode代為產生的 adhoc provision profile」全部刪掉
自己重新設定「adhoc provision profile」即可
app id 與原來的相同
以前上架 iOS app 時
都要上傳各尺寸的螢幕截圖
3.5″ 4″ 4.7″ 5.5.” 四種大小
如果每個 5 張,就得要 5×4=20 張
今天上架時
發現只要上傳最大的解析度即可
5.5″ (1242×2208)
其他較小的尺寸預設就會自動套用
(當然,如果要自己上傳各尺寸也是可以)
真是 iOS Developer 的一大福音…
由於此書的版權擁有者要求此 app 下架
否則提出侵權告訴
所以此 app 已經下架了
It took me one night to make it work, so I’d like to write it down for next time.
Main Flow as follow diagram:
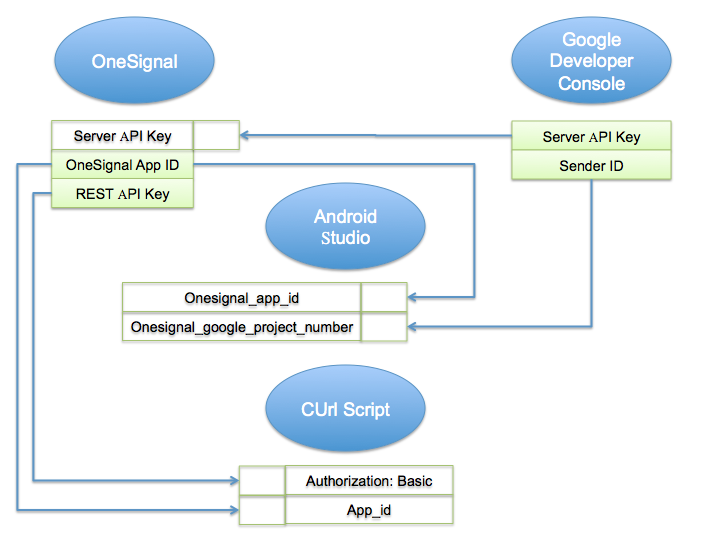
Green fields means “what values you can get”
White fields means “what values you should set”
And following are screeshots for each steps
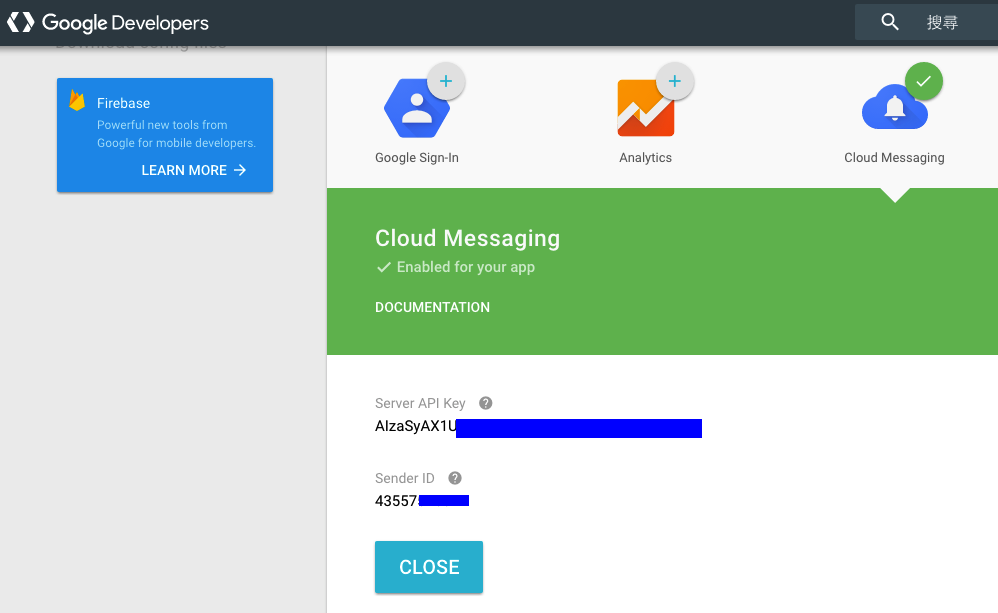
1.Google Developer Console (GCM)
Get these two values.
2.Set the Server API Key in OneSignal
Set OneSignal「Server API Key」to 「Server API Key」in Step 1

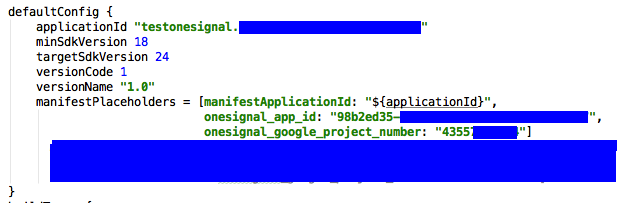
3.Set the Project number in Android Studio MainFest.xml (onesignal_google_project_number)
Set the onesignal_google_project_number to 「Sender ID」in Step 1

4.Onesignal (App Settings -> Keys & IDs)
Get these values.

5.Set the OneSignal App ID in Android Studio MainFest.xml (onesignal_app_id)
Set the onesignal_app_id to 「OneSignal App ID」in Step 4
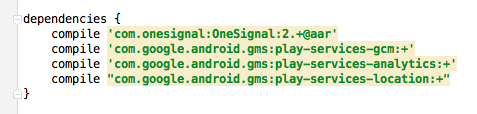
6.Include libraries in Android Studio
This is according to the OneSignal document
Basically this is all you have to do to send push notification to Android devices via OneSignal and Android Studio.
By the way, I used to use the CUrl script provided by OneSignal to test sending notification, here’s a sample for your reference.
7.CUrl script
There are two fields to be set.
「Authorization Basic」 : set to 「REST API Key」in Step 4
「app_id」: set to 「OneSignal App ID」in Step 4
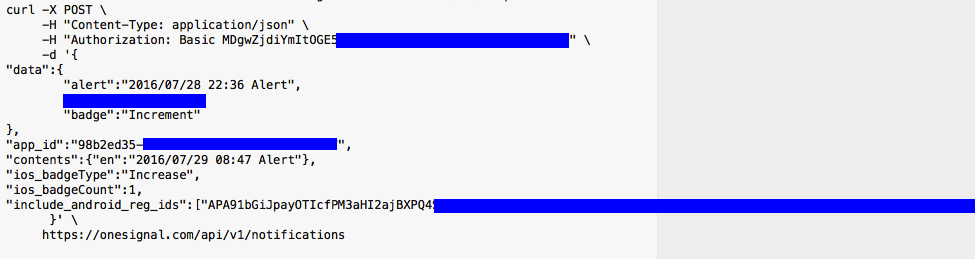
That’s all, happy pushing !!
Facebook signin ios
Follow the official document procedure
https://developers.facebook.com/docs/facebook-login/ios
1.Download SDK and setup the environment
https://developers.facebook.com/docs/ios/getting-started
Create new Facebook app


2.Configure the XCode project parameters
Info.plist

For AppTransportSecurity parameters, you can follow the Facebook direction, or you can just “allow all” as follow
<key>NSAppTransportSecurity</key>
<dict>
<key>NSAllowsArbitraryLoads</key>
<true/>
</dict>
3.Modify the source code
3.1 AppDelegate
#import <FBSDKCoreKit/FBSDKCoreKit.h>
– (BOOL)application:(UIApplication *)application didFinishLaunchingWithOptions:(NSDictionary *)launchOptions {
[[FBSDKApplicationDelegate sharedInstance] application:application didFinishLaunchingWithOptions:launchOptions];
….
}
3.2 ViewController you want to do Facebook Signin
#import <FBSDKCoreKit/FBSDKCoreKit.h>
#import <FBSDKLoginKit/FBSDKLoginKit.h>
-(void)loginAsFacebook {
FBSDKLoginManager *login = [[FBSDKLoginManager alloc] init];
[login logInWithReadPermissions: @[@”public_profile”, @”email”, @”user_friends”] fromViewController:self handler:^(FBSDKLoginManagerLoginResult *result, NSError *error) {
if (error) {
NSLog(@”Process error”);
} else if (result.isCancelled) {
NSLog(@”Cancelled”);
} else {
NSLog(@”Logged in”);
NSLog(@”[%@][%@][%@][%@]”, [[FBSDKAccessToken currentAccessToken]appID],
[[FBSDKAccessToken currentAccessToken]userID],
[[FBSDKAccessToken currentAccessToken]refreshDate],
[[FBSDKAccessToken currentAccessToken]tokenString]
);
//Get some profile data
FBSDKGraphRequest *requestMe = [[FBSDKGraphRequest alloc]initWithGraphPath:@”me” parameters:@{@”fields”: @”email, first_name, last_name”}];
FBSDKGraphRequestConnection *connection = [[FBSDKGraphRequestConnection alloc] init];
[connection addRequest:requestMe completionHandler:^(FBSDKGraphRequestConnection *connection, id result, NSError *error) {
if(result) {
NSString *sUserID, *sEmail, *sFirstName, *sLastName;
if ([result objectForKey:@”email”]) {
sEmail = [result objectForKey:@”email”];
}
if ([result objectForKey:@”first_name”]) {
sFirstName = [result objectForKey:@”first_name”];
}
if ([result objectForKey:@”last_name”]) {
sLastName = [result objectForKey:@”last_name”];
}
if ([result objectForKey:@”id”]) {
sUserID = [result objectForKey:@”id”];
}
NSLog(@”Customer details:[%@][%@][%@][%@]”, sUserID, sFirstName, sLastName, sEmail);
//Facebook account was authenticated OK, do whatever you need
}];
[connection start];
}
}];
}
Google Sign-in for iOS
1.Download GoogleSignIn SDK
https://developers.google.com/identity/sign-in/ios/sdk/
There are two ways to get the SDK, CocoaPod or direct download,
Personally I preferred the download way.
Follow the official document procedure
https://developers.google.com/identity/sign-in/ios/start
2.Get configuration file
https://developers.google.com/mobile/add?platform=ios&cntapi=signin&cntapp=Default%20Demo%20App&cntpkg=com.google.samples.quickstart.SignInExample&cnturl=https:%2F%2Fdevelopers.google.com%2Fidentity%2Fsign-in%2Fios%2Fstart%3Fconfigured%3Dtrue&cntlbl=Continue%20with%20Try%20Sign-In

3.Copy to project directory first then “pull” into xcode project
Basically just pull the configuration file into the xcode project and it is OK.
But you will gonna thank me for this lousy procedure when there are multiple configuration files in one xcode project.

4.Configure xcode project-level parameters
https://developers.google.com/identity/sign-in/ios/sign-in?configured=true
Put REVERSED_CLIENT_ID into Project -> Target -> Info -> URL Types
Put bundle id into Project -> Target -> Info -> URL Types

5.Modify source code
There will be only one file to be modified – AppDelegate
The most important statement is to set [GIDSignIn sharedInstance].clientID = CLIENT_ID(in configuration)